If you’re looking for the ultimate Quinoa Chocolate Bars, this easy no-bake recipe is the perfect combination of rich chocolate, creamy peanut butter, and crispy puffed quinoa. These wholesome bars come together with simple pantry ingredients and require no oven, making them ideal for busy weekdays, meal prep, or a quick homemade dessert.
Unlike traditional dessert bars, these no-bake quinoa chocolate bars are packed with crunchy puffed quinoa, quick oats, and a smooth chocolate topping that delivers the perfect balance of chewy and crispy textures. They’re naturally sweetened with honey, easy to customize with your favorite nuts or seeds, and stay fresh in the refrigerator for grab-and-go snacks all week long.
Whether you’re searching for a healthier chocolate treat, an easy snack bar recipe, or a make-ahead dessert, these homemade quinoa chocolate bars check every box. Once you try their rich chocolate flavor and satisfying crunch, they’ll quickly become one of your favorite no-bake recipes.
💛 Why You’ll Love This Recipe
These quinoa chocolate bars are rich, chewy, crunchy, and easy to make with simple pantry ingredients. They have the flavor of a chocolate peanut butter dessert bar, but the puffed quinoa and oats give them a lighter, crispier texture that makes them perfect for snacking.
This no-bake quinoa chocolate bar recipe is also great for meal prep because the bars store well in the refrigerator and freezer. You can make a batch ahead of time, slice them into squares, and enjoy them throughout the week whenever you want a homemade chocolate treat.
Easy No-Bake Dessert
No oven is needed for these homemade quinoa chocolate bars. The mixture comes together quickly on the stovetop, then chills in the refrigerator until firm.
Rich Chocolate Peanut Butter Flavor
Peanut butter, cocoa powder, honey, and chocolate chips create a sweet, fudgy flavor with just the right amount of richness.
Crispy and Chewy Texture
Puffed quinoa adds crunch, while quick oats help the bars hold together and create a satisfying chewy bite.
Great for Make-Ahead Snacks
These chocolate quinoa bars stay firm when chilled, making them perfect for lunch boxes, afternoon snacks, or healthier dessert prep.
🛒 Ingredient Notes
These quinoa chocolate bars use simple pantry staples that work together to create a chewy, crunchy texture and rich chocolate flavor. Choosing the right ingredients helps the bars hold together while delivering the perfect balance of sweetness and crunch.
Puffed Quinoa
Puffed quinoa is the star ingredient in this recipe. It provides a light, crispy texture that’s similar to crispy rice cereal while adding whole-grain goodness. Be sure to use puffed quinoa rather than raw or cooked quinoa, as neither will produce the correct texture.
Quick Oats
Quick oats help bind the bars together while adding a soft, chewy bite. They absorb the peanut butter mixture more evenly than old-fashioned oats, resulting in bars that slice cleanly and hold their shape.
Oat Flour
A small amount of oat flour helps absorb excess moisture and gives the bars a firmer texture without making them dry. If you don’t have oat flour, simply blend quick oats into a fine powder.
Creamy Peanut Butter
Well-stirred creamy peanut butter acts as the primary binder while adding a rich, nutty flavor. Traditional creamy peanut butter produces the firmest bars, while natural peanut butter may create a slightly softer texture.
Honey
Honey naturally sweetens the bars while helping everything stick together. It creates a firmer texture than maple syrup, making it the preferred sweetener for this recipe.
Coconut Oil or Butter
A small amount of coconut oil or butter makes the peanut butter mixture smoother and helps keep the bars tender after chilling.
Dutch-Process Cocoa Powder
Dutch-process cocoa powder delivers a deep, smooth chocolate flavor with less bitterness. Regular unsweetened cocoa powder can also be used if that’s what you have on hand.
Vanilla Extract
Pure vanilla extract enhances the chocolate and peanut butter flavors while adding warmth and depth.
Salt
A little salt balances the sweetness and intensifies the chocolate flavor. Adjust the amount depending on whether your peanut butter is salted or unsalted.
Espresso Powder (Optional)
A pinch of espresso powder won’t make the bars taste like coffee. Instead, it enhances the richness of the chocolate and creates a deeper cocoa flavor.
Mini Chocolate Chips
Mini chocolate chips add little bursts of chocolate throughout every bite. Let the peanut butter mixture cool slightly before folding them in to help them keep their shape.
Chopped Nuts (Optional)
Roasted peanuts, almonds, or walnuts add extra crunch and complement the chocolate and peanut butter flavors beautifully.
Chocolate Chips
Semi-sweet chocolate chips create a smooth, glossy topping that hardens beautifully once chilled while remaining easy to bite into.
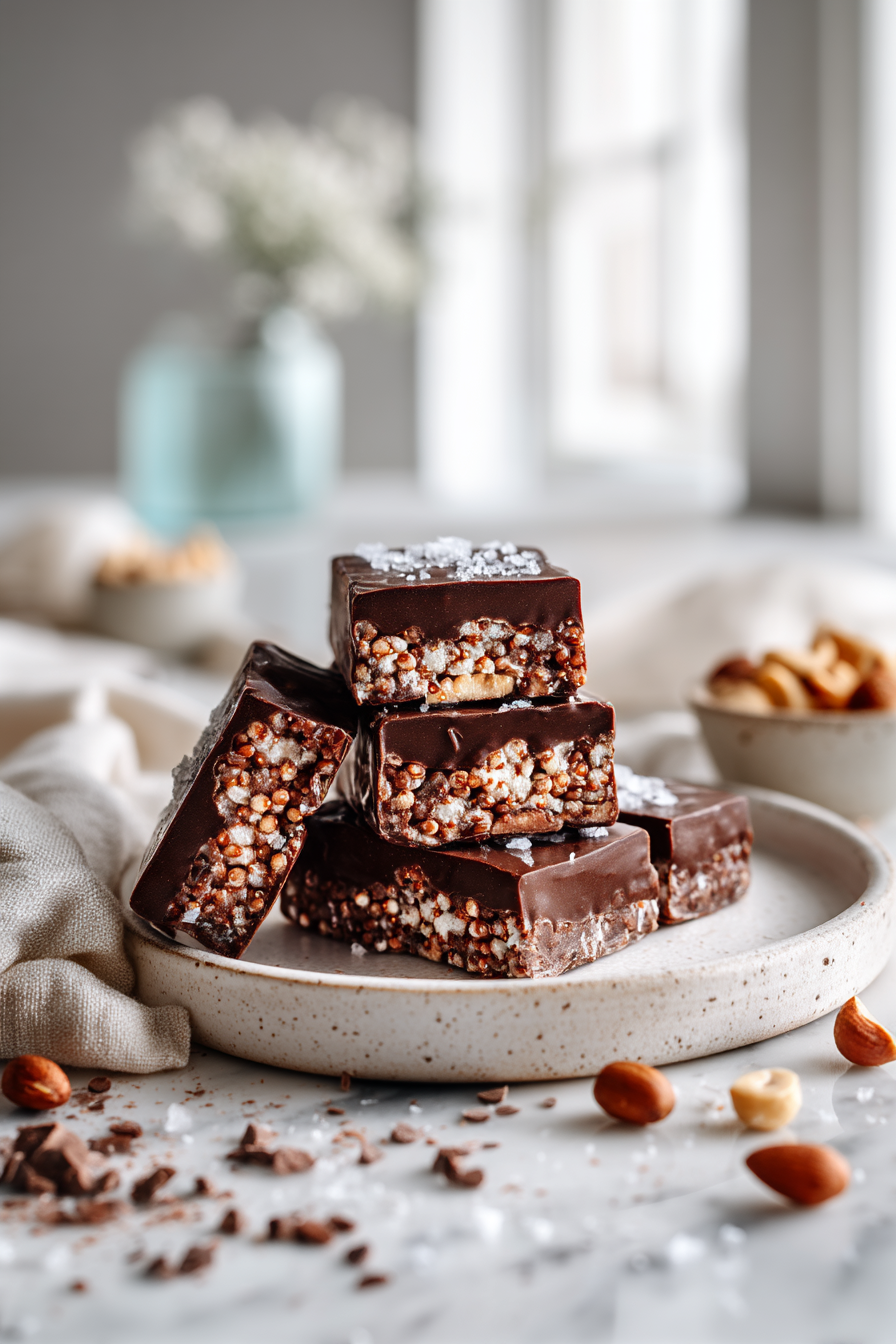
Flaky Sea Salt (Optional)
A light sprinkle of flaky sea salt adds a gourmet finish and enhances the sweet chocolate flavor without overpowering the bars.
🍫 How to Make Quinoa Chocolate Bars
These quinoa chocolate bars are easy to make with a quick stovetop mixture, a simple chocolate topping, and a little chill time. The key is to use puffed quinoa, press the mixture firmly into the pan, and let the bars fully set before slicing.
Step 1: Prepare the Pan
Line an 8×8-inch baking pan with parchment paper, leaving a little overhang on the sides. This makes it easy to lift the chilled bars out of the pan before slicing.
Step 2: Toast the Quinoa and Oats
Add the puffed quinoa and quick oats to a dry skillet over low heat. Toast for 1 to 2 minutes, stirring constantly, just until lightly fragrant. Do not let them brown, as puffed quinoa can burn quickly.
Step 3: Mix the Dry Ingredients
Transfer the toasted puffed quinoa and oats to a large mixing bowl. Stir in the oat flour and chopped nuts, if using.
Step 4: Make the Chocolate Peanut Butter Mixture
In a small saucepan over low heat, combine the creamy peanut butter, honey, coconut oil or butter, cocoa powder, salt, and espresso powder if using. Stir until the mixture is smooth, glossy, and fully combined. Do not boil.
Step 5: Add the Vanilla
Remove the saucepan from the heat and stir in the vanilla extract. Let the mixture cool for 2 to 3 minutes so it is warm but not hot.
Step 6: Combine the Bar Mixture
Pour the warm chocolate peanut butter mixture over the puffed quinoa and oats. Stir until everything is evenly coated and the mixture looks thick and sticky.
Step 7: Fold in Chocolate Chips
Fold in the mini chocolate chips, if using. Letting the chocolate peanut butter mixture cool slightly first helps prevent the mini chocolate chips from melting completely.
Step 8: Press Into the Pan
Transfer the mixture to the prepared baking pan. Press it very firmly into an even layer using a spatula or the bottom of a measuring cup. This step helps the no-bake quinoa bars hold together after chilling.
Step 9: Add the Chocolate Topping
Melt the semi-sweet chocolate chips and coconut oil or butter in the microwave in 20-second intervals, stirring between each interval until smooth. Spread the melted chocolate evenly over the bars and sprinkle with flaky sea salt if desired.
Step 10: Chill and Score
Refrigerate the bars for about 20 to 30 minutes, then lightly score the chocolate topping into 16 bars with a sharp knife. Scoring the topping before it fully hardens helps prevent cracking when sliced.
Step 11: Slice and Serve
Return the pan to the refrigerator for another 1 1/2 to 2 hours, or until the bars are fully firm. Let them sit at room temperature for 5 minutes, then slice along the scored lines and serve chilled.
⭐ Pro Tips for the Best Quinoa Chocolate Bars
These quinoa chocolate bars are simple to make, but a few easy tips will help you get the best flavor, texture, and cleanest slices every time.
Use Puffed Quinoa Only
For the best no-bake texture, use puffed quinoa. Raw quinoa is too hard, and cooked quinoa adds too much moisture, which can make the bars soft and difficult to slice.
Toast Gently
Lightly toasting the puffed quinoa and oats adds a deeper, nuttier flavor. Keep the heat low and stir constantly because puffed quinoa can burn quickly.
Do Not Boil the Peanut Butter Mixture
Warm the peanut butter, honey, cocoa powder, and coconut oil just until smooth and glossy. Boiling can make the mixture too thick and may cause the bars to set too firm.
Press the Bars Firmly
Press the mixture tightly into the pan using the bottom of a measuring cup or spatula. This helps the homemade quinoa chocolate bars hold together instead of crumbling.
Score Before Fully Set
After the chocolate topping chills for 20 to 30 minutes, lightly score the top into bars. This helps prevent the chocolate layer from cracking when you slice the bars later.
Chill Completely Before Slicing
Let the bars chill until fully firm before cutting. For the cleanest slices, let them sit at room temperature for 5 minutes and use a warm, dry knife.
Store in the Refrigerator
These no-bake chocolate quinoa bars are best kept chilled. The refrigerator helps them stay firm, chewy, and crisp with a smooth chocolate topping.
✨ Quinoa Chocolate Bar Variations
One of the best things about these quinoa chocolate bars is how easy they are to customize. With a few simple swaps and mix-ins, you can create a new flavor every time while keeping the same chewy, crunchy texture.
Dark Chocolate Quinoa Bars
Replace the semi-sweet chocolate chips with dark chocolate chips for a richer, more intense chocolate flavor. A sprinkle of flaky sea salt on top makes them even more decadent.
Almond Butter Version
Swap the peanut butter for creamy almond butter to create a slightly milder, nuttier flavor. This variation pairs especially well with chopped almonds and dark chocolate.
Crunchy Peanut Butter Bars
Use crunchy peanut butter instead of creamy for even more texture and a delicious peanut crunch in every bite.
Coconut Chocolate Bars
Mix in 1/4 cup of unsweetened shredded coconut for a tropical twist that complements the chocolate and honey beautifully.
Trail Mix Bars
Add chopped walnuts, pecans, pumpkin seeds, sunflower seeds, dried cranberries, or raisins for a hearty snack that’s perfect for lunch boxes or hiking.
Double Chocolate Bars
Increase the mini chocolate chips to 1/2 cup and drizzle additional melted chocolate over the top after chilling for an extra indulgent dessert.
Peanut Butter Cup Bars
Fold chopped peanut butter cups into the mixture before pressing it into the pan for a candy-inspired treat that’s perfect for chocolate lovers.
Mocha Chocolate Bars
Increase the espresso powder to 1/2 teaspoon for a subtle mocha flavor that enhances the richness of the chocolate without overpowering it.
Nut-Free Option
Replace the peanut butter with sunflower seed butter and omit the chopped nuts. Always check that your chocolate chips and other ingredients are produced in a nut-free facility if needed.
Protein-Packed Version
Stir 2 to 3 tablespoons of your favorite chocolate or vanilla protein powder into the dry ingredients. If the mixture becomes too thick, add an extra tablespoon of peanut butter or honey to maintain the perfect texture.
📦 Storage and Make-Ahead Tips
These quinoa chocolate bars are an excellent make-ahead snack or dessert. They store beautifully in the refrigerator and freezer, making them perfect for meal prep and grab-and-go treats throughout the week.
Refrigerator
Store the bars in an airtight container in the refrigerator for up to 1 week. Place a sheet of parchment paper between layers to prevent the chocolate topping from sticking.
Freezer
For longer storage, freeze the bars in a freezer-safe container or zip-top freezer bag for up to 2 months. Separate layers with parchment paper to keep them from sticking together.
How to Thaw
Transfer the bars to the refrigerator overnight to thaw, or let them sit at room temperature for 5 to 10 minutes before serving. This allows the chocolate topping to soften slightly while the bars remain firm.
Make Ahead
These no-bake quinoa chocolate bars can be made up to 2 days in advance for parties, lunches, or weekly meal prep. In fact, the flavor and texture improve after several hours in the refrigerator, making them an ideal make-ahead dessert.
Packing for Lunch
Because the bars are made with peanut butter and a chocolate topping, they are best kept cool. If packing them in a lunch box or taking them on the go, use an insulated lunch bag with an ice pack to help maintain their texture, especially during warm weather.
❓ Frequently Asked Questions
Can I use cooked quinoa instead of puffed quinoa?
No. Cooked quinoa contains too much moisture for this no-bake recipe and will make the bars soft and difficult to hold together. Puffed quinoa provides the light, crispy texture these quinoa chocolate bars are known for.
Where can I buy puffed quinoa?
Puffed quinoa is available at many natural grocery stores, health food stores, and online retailers. It’s often found near granola, cereal, or other specialty grains.
Can I use maple syrup instead of honey?
Yes. Maple syrup works well, but the bars will have a slightly softer texture than those made with honey. Keep maple syrup versions refrigerated until serving.
Can I make these quinoa chocolate bars gluten-free?
Yes. Simply use certified gluten-free quick oats and confirm that all remaining ingredients, including the chocolate chips, are labeled gluten-free.
Can I use natural peanut butter?
Yes, but make sure it is thoroughly stirred before measuring. Since natural peanut butter is often thinner than conventional peanut butter, the bars may be slightly softer after chilling.
Why are my bars falling apart?
The mixture may not have been pressed firmly enough into the pan, or the bars may not have chilled long enough. If the mixture seems dry before pressing it into the pan, stir in an extra tablespoon or two of peanut butter.
Can I freeze quinoa chocolate bars?
Absolutely. Wrap the bars individually or place parchment paper between layers before freezing for up to 2 months. Thaw overnight in the refrigerator or let them sit at room temperature for 5 to 10 minutes before enjoying.
How do I keep the chocolate topping from cracking?
Score the chocolate after about 20 to 30 minutes of chilling, before it fully hardens. When you’re ready to serve, let the bars sit at room temperature for a few minutes and slice them with a warm knife for clean, neat cuts.

Quinoa Chocolate Bars
Equipment
- 8×8 inch baking pan
- Parchment paper
- Large mixing bowl
- Small saucepan
- Rubber spatula
- measuring cups
- Measuring spoons
- Wooden spoon or silicone spoon
- Microwave-safe bowl
- Offset spatula or the bottom of a measuring cup (for pressing the bars)
- Sharp knife
- Cutting board
Ingredients
Bars
- 1 1/2 cups puffed quinoa
- 3/4 cup quick oats
- 2 tablespoons oat flour
- 3/4 cup creamy peanut butter well stirred
- 1/2 cup honey
- 1 tablespoon coconut oil or unsalted butter
- 1/4 cup Dutch-process cocoa powder or regular unsweetened cocoa powder
- 1 teaspoon vanilla extract
- 1/4 teaspoon salt use 1/2 teaspoon if your peanut butter is unsalted
- 1/4 teaspoon espresso powder optional
- 1/3 cup mini semi-sweet chocolate chips optional
- 1/4 cup chopped roasted peanuts almonds, or walnuts (optional)
Chocolate Topping
- 2/3 cup semi-sweet chocolate chips
- 2 teaspoons coconut oil or unsalted butter
- Flaky sea salt for garnish (optional)
Instructions
- Line an 8×8-inch baking pan with parchment paper, leaving an overhang on two sides for easy removal.
- Place the puffed quinoa and quick oats in a dry skillet over low heat. Toast for 1 to 2 minutes, stirring constantly, until lightly fragrant. Remove from the heat immediately and transfer to a large mixing bowl. Stir in the oat flour and chopped nuts, if using.
- In a small saucepan over low heat, combine the peanut butter, honey, coconut oil, cocoa powder, salt, and espresso powder, if using. Stir constantly until the mixture is smooth and glossy. Do not let it simmer or boil.
- Remove from the heat and stir in the vanilla extract. Let the mixture cool for 2 to 3 minutes so it is warm rather than piping hot.
- Pour the peanut butter mixture over the toasted quinoa mixture and stir until everything is evenly coated.
- Fold in the mini chocolate chips, if using.
- Transfer the mixture to the prepared pan and press it very firmly into an even layer using the bottom of a measuring cup or an offset spatula.
- Melt the chocolate chips and coconut oil for the topping in the microwave using 20-second intervals, stirring between each interval until smooth.
- Spread the melted chocolate evenly over the bars and sprinkle with flaky sea salt if desired.
- Refrigerate for about 20 minutes, then lightly score the chocolate into 16 bars with a sharp knife.
- Return the pan to the refrigerator for another 1½ to 2 hours, or until completely firm.
- Let the bars sit at room temperature for about 5 minutes before slicing along the score lines. For the cleanest cuts, warm the knife under hot water, wipe it dry, and clean it between slices.
Notes
🍫 More Homemade Chocolate Treats You’ll Love
If you enjoyed these Quinoa Chocolate Bars, here are a few more decadent chocolate recipes to satisfy your sweet tooth. From stuffed chocolate bars to creamy truffles and homemade candy bars, these reader favorites are perfect for gifting, holidays, or everyday indulgence.
- Cotton Candy Cream Stuffed Chocolate Bar – A fun and colorful chocolate bar with a fluffy cotton candy cream filling that’s perfect for birthdays and celebrations.
- Espresso Caramel Truffles – Rich chocolate truffles filled with smooth caramel and a hint of espresso for an elegant homemade dessert.
- Homemade Milky Way Bars – Soft nougat, gooey caramel, and creamy milk chocolate come together in this homemade version of the classic candy bar.
Leave a Reply