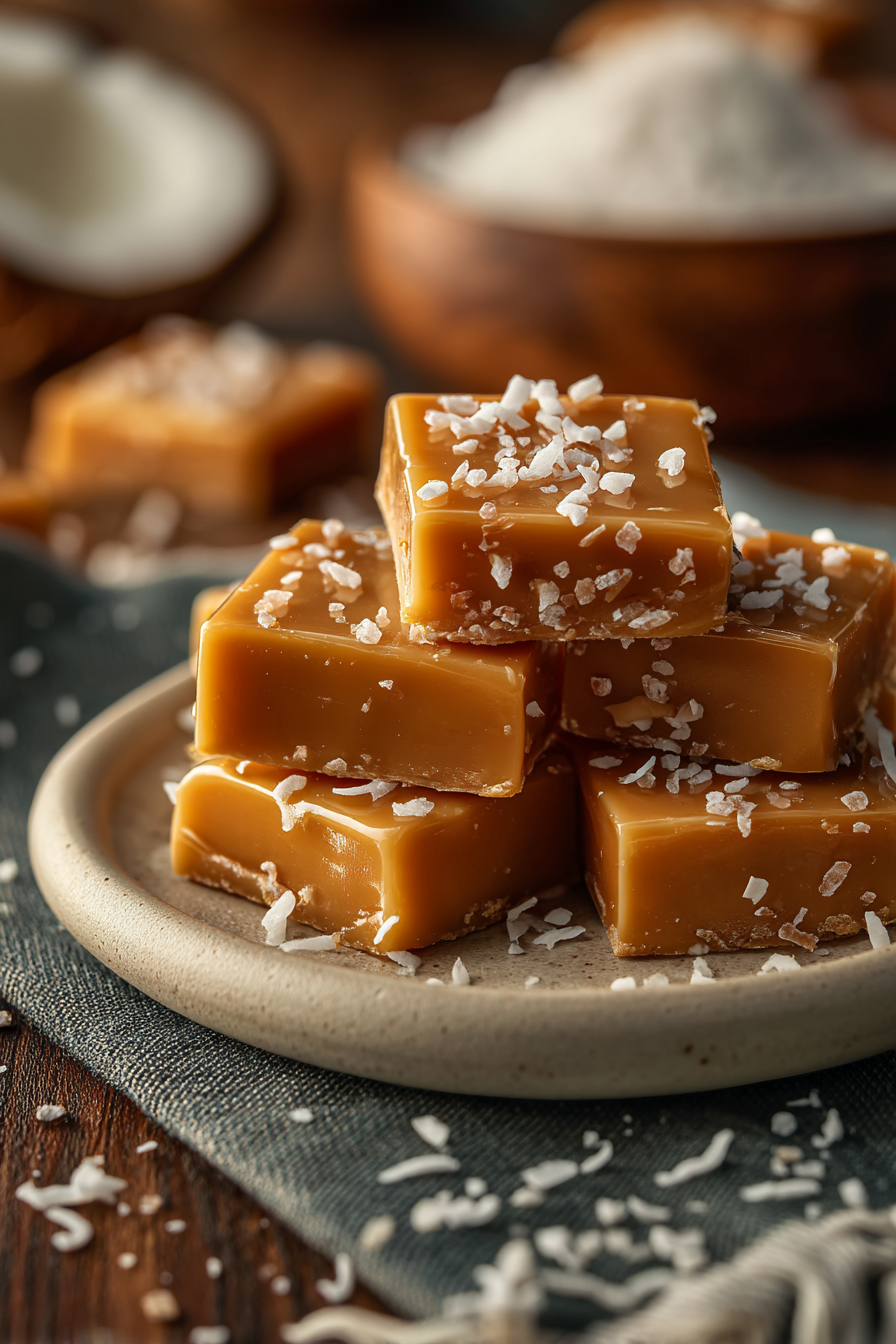
These Homemade Coconut Caramels are rich, buttery, and perfectly chewy with a deep toasted coconut flavor in every bite. Made with sweetened condensed milk, brown sugar, real butter, and toasted coconut, these soft caramel candies have a smooth melt-in-your-mouth texture that tastes like something straight from a gourmet candy shop. Whether you’re making them for the holidays, gifting them to friends and family, or simply satisfying a sweet tooth, these coconut caramels are guaranteed to disappear fast.
What makes this Coconut Caramels recipe special is the balance of rich caramelized sugar and naturally nutty toasted coconut. Unlike many homemade caramel recipes that can turn out overly sweet or grainy, these candies stay soft, chewy, and flavorful thanks to a carefully balanced ingredient ratio and proper cooking temperature. They’re easy to make, freezer-friendly, and perfect for adding to holiday cookie trays, dessert platters, and homemade gift boxes.
🥥 Why You’ll Love This Coconut Caramels Recipe
Rich Buttery Caramel Flavor
These coconut caramels have a deep, buttery caramel flavor made with brown sugar, sweetened condensed milk, and real butter. Every bite is rich, smooth, and perfectly balanced without being overly sweet.
Perfect Soft and Chewy Texture
Cooked to the ideal temperature, these homemade caramels stay soft, chewy, and melt-in-your-mouth delicious. They have the classic candy-shop texture that makes homemade caramel candies so irresistible.
Loaded with Toasted Coconut Flavor
Toasted coconut adds a wonderful nutty flavor and aroma that takes these caramels to the next level. The coconut complements the rich caramel beautifully while adding a subtle texture throughout each piece.
Perfect for Gifts and Holidays
These coconut caramels are wonderful for holiday cookie trays, homemade gift boxes, bake sales, party favors, and special occasions. Individually wrapped pieces look beautiful and make thoughtful homemade gifts.
Easy to Make at Home
With simple ingredients and straightforward instructions, this recipe allows you to create professional-quality caramel candies right in your own kitchen. A candy thermometer helps ensure perfect results every time.
Easy to Customize
Add flaky sea salt, dip the caramels in dark chocolate, or mix in chopped macadamia nuts to create your own unique variation. This versatile recipe can be adapted to suit your favorite flavors and toppings.
🥥 Ingredients Notes for Coconut Caramels
Unsalted Butter
Unsalted butter gives these homemade coconut caramels their rich, creamy flavor and soft chewy texture. Using unsalted butter also lets you control the salt level more accurately, which is important for balancing the sweetness of the caramel.
Light Brown Sugar
Light brown sugar adds warm caramel flavor, moisture, and a slightly deeper sweetness than granulated sugar alone. It helps give the coconut caramels a richer candy-shop flavor without making them taste too dark or bitter.
Granulated Sugar
A small amount of granulated sugar helps build the caramel structure and gives the candies a clean sweetness. Keeping the amount moderate helps the finished caramels stay balanced instead of overly sugary.
Light Corn Syrup
Light corn syrup helps prevent crystallization, keeping the caramel smooth, glossy, and chewy. It also helps the coconut caramels hold their soft candy texture after cooling.
Sweetened Condensed Milk
Sweetened condensed milk adds creaminess, sweetness, and a smooth texture to the caramel base. It gives these homemade caramels their classic rich, milky flavor.
Heavy Cream
Heavy cream softens the caramel and gives it a luxurious, creamy chew. Room temperature cream blends more evenly into the mixture and helps the caramel cook smoothly.
Fine Sea Salt
Fine sea salt balances the sweetness and enhances the buttery caramel flavor. It makes the toasted coconut and vanilla notes stand out more clearly.
Vanilla Extract
Vanilla extract rounds out the caramel flavor and adds warmth to the finished candy. It helps make the coconut caramels taste richer and more bakery-style.
Coconut Extract
A small amount of coconut extract boosts the coconut flavor without overpowering the caramel. Since coconut extract can be strong, a little goes a long way.
Toasted Sweetened Shredded Coconut
Toasted sweetened shredded coconut gives these coconut caramels their signature flavor and texture. Toasting the coconut adds nutty depth and makes the finished candy taste richer, warmer, and more flavorful.
🥥 How to Make Coconut Caramels
Prepare the Pan
Line an 8×8-inch metal baking pan with parchment paper, leaving a little overhang on the sides so the coconut caramels are easy to lift out after cooling. Lightly grease the parchment to prevent sticking.
Toast the Coconut
Add the sweetened shredded coconut to a dry skillet over medium-low heat. Stir constantly for 5 to 7 minutes, or until the coconut is golden brown and fragrant. Let it cool completely, then finely chop it so it blends evenly into the caramel.
Make the Caramel Base
In a heavy-bottom saucepan, combine the butter, light brown sugar, granulated sugar, light corn syrup, sweetened condensed milk, heavy cream, and fine sea salt. Cook over medium-low to medium heat, stirring constantly with a silicone spatula, until the mixture is smooth and fully combined.
Cook to the Right Temperature
Continue cooking the caramel, stirring constantly, until it reaches exactly 245°F on a candy thermometer. The mixture should be thick, glossy, smooth, and medium-deep caramel brown. Remove the pan from the heat immediately once it reaches temperature so the homemade caramels stay soft and chewy.
Add the Coconut Flavor
Off the heat, stir in the vanilla extract, coconut extract, and toasted coconut until evenly combined. The vanilla adds warmth, while the coconut extract and toasted coconut give these coconut caramels their rich, tropical flavor.
Pour and Cool
Pour the caramel mixture into the prepared pan and smooth the top. If desired, sprinkle lightly with flaky sea salt. Let the caramel cool completely at room temperature for 4 to 6 hours, or overnight, until firm enough to slice.
Slice and Wrap
Lift the cooled caramel from the pan using the parchment paper. Cut into small squares with a lightly greased sharp knife, wiping the knife between cuts as needed. Wrap the coconut caramels individually in wax paper for easy serving, gifting, and storing.
🥥 Pro Tips for the Best Coconut Caramels
Use a Reliable Candy Thermometer
The most important step when making homemade coconut caramels is reaching the correct temperature. Cook the caramel to exactly 245°F for a soft, chewy texture. Even a few extra degrees can result in firmer caramels.
Toast the Coconut for Maximum Flavor
Toasted coconut adds a deeper, nuttier flavor that makes these coconut caramels taste richer and more complex. Do not skip this step if you want the best possible coconut flavor.
Choose a Heavy-Bottom Saucepan
A heavy-bottom saucepan helps distribute heat evenly and reduces the risk of scorching. Thin pans can create hot spots that may burn the caramel or cause greasy separation.
Stir Constantly While Cooking
Consistent stirring helps the sugars dissolve evenly and prevents the caramel from sticking to the bottom of the pan. This creates a smoother and more professional candy texture.
Remove the Caramel Immediately at 245°F
Once the caramel reaches the target temperature, remove it from the heat right away. The mixture will continue holding heat briefly, and overcooking can lead to harder candy.
Finely Chop the Toasted Coconut
Smaller coconut pieces distribute more evenly throughout the caramel, creating a smoother bite and cleaner slices. This also helps prevent the caramels from breaking when cut.
Allow the Caramels to Cool at Room Temperature
For the best texture, let the coconut caramels cool naturally at room temperature. Rapid cooling in the refrigerator can sometimes create condensation and affect the texture.
Grease Your Knife Before Cutting
A lightly greased knife will slide through the caramel more easily and create cleaner edges. Wipe and re-grease the blade as needed between cuts.
Add Flaky Sea Salt for Extra Flavor
A light sprinkle of flaky sea salt on top enhances the buttery caramel flavor and balances the sweetness beautifully. This simple addition makes the caramels taste even more gourmet.
Let Them Rest Overnight Before Wrapping
If you plan to wrap the caramels individually, allowing them to rest overnight helps them fully set and makes wrapping easier. The texture also becomes even more consistent after resting.
🥥 Coconut Caramel Variations
Chocolate-Dipped Coconut Caramels
Dip the cooled coconut caramels in melted dark chocolate or milk chocolate for a rich candy-shop treat. The combination of chocolate, caramel, and toasted coconut creates an irresistible flavor similar to your favorite chocolate coconut candies.
Salted Coconut Caramels
Sprinkle flaky sea salt over the top of the warm caramel before it sets. The salt balances the sweetness and enhances the buttery caramel flavor while adding a gourmet finish.
Toasted Coconut Macadamia Caramels
Stir 1/2 cup finely chopped toasted macadamia nuts into the caramel mixture along with the toasted coconut. The buttery crunch pairs perfectly with the rich coconut flavor.
Almond Joy Inspired Coconut Caramels
Add chopped roasted almonds to the caramel mixture and dip the finished candies in dark chocolate. This variation delivers the flavors of a classic Almond Joy candy bar in soft caramel form.
White Chocolate Coconut Caramels
Drizzle melted white chocolate over the cooled caramels or fully coat each piece for an extra sweet and creamy coconut candy experience.
Coconut Rum Caramels
Add 1 teaspoon of rum extract along with the vanilla and coconut extracts for a tropical-inspired caramel with rich island flavors.
Coconut Pecan Caramels
Mix finely chopped toasted pecans into the caramel for a delicious combination of nutty crunch and chewy coconut caramel goodness.
Coconut Lime Caramels
Add 1 teaspoon of finely grated lime zest to the finished caramel mixture for a bright citrus flavor that complements the toasted coconut beautifully.
Mocha Coconut Caramels
Stir 1 teaspoon espresso powder into the caramel base while cooking to create a subtle coffee flavor that pairs wonderfully with coconut and caramel.
Dark Chocolate Sea Salt Coconut Caramels
Dip the finished caramels in dark chocolate and finish with flaky sea salt for a sophisticated dessert candy that combines sweet, salty, and rich chocolate flavors in every bite.
🥥 Storage and Make Ahead Tips
How to Store Coconut Caramels
Store the coconut caramels in an airtight container at cool room temperature for up to 2 weeks. For best results, place sheets of wax paper or parchment paper between layers to prevent the candies from sticking together.
Wrap Individual Caramels
If you plan to gift or serve the caramels later, wrap each piece individually in wax paper after they have fully cooled and set. Individually wrapped coconut caramels stay fresher longer and are easier to transport and share.
Refrigerator Storage
For longer storage, place the caramels in an airtight container and refrigerate for up to 1 month. Allow them to sit at room temperature for 10 to 15 minutes before serving so they soften slightly and regain their chewy texture.
Freezing Instructions
These homemade coconut caramels freeze beautifully. Wrap the individual caramels in wax paper, place them in a freezer-safe container or zip-top bag, and freeze for up to 3 months. Thaw overnight in the refrigerator or at room temperature before enjoying.
Make Ahead for Holidays and Gifts
Coconut caramels are an excellent make-ahead candy recipe for holiday dessert trays, gift boxes, and special occasions. Prepare them several days in advance and store them in an airtight container until ready to serve or package.
Best Texture After Cooling
For the cleanest cuts and best chewy texture, allow the caramels to cool completely and rest overnight before slicing and wrapping. This extra resting time helps the caramel fully set and develop its ideal consistency.
Avoid Excess Heat
Keep the caramels away from direct sunlight, warm kitchens, or heat sources. Excessive heat can soften the candies and make them sticky, especially during warmer months.
Perfect for Candy Trays
Because these coconut caramels stay fresh for days, they are perfect for preparing ahead for holiday cookie trays, dessert platters, bake sales, and homemade edible gifts.
🥥 Coconut Caramels FAQ
Why are my coconut caramels too hard?
If your coconut caramels are too hard, the caramel mixture was likely cooked past 245°F. Candy temperature is very precise, and even a few extra degrees can make homemade caramels firmer than intended.
Why are my coconut caramels too soft?
If the caramels are too soft, they may not have reached the correct temperature. Make sure the caramel cooks to 245°F on a reliable candy thermometer before removing it from the heat.
Do I have to toast the coconut?
Toasting the coconut is highly recommended because it adds a richer, nuttier flavor to the caramels. Untoasted coconut will still work, but the finished coconut caramels will have a milder flavor.
Can I use unsweetened coconut?
Yes, you can use unsweetened shredded coconut, but the texture may be slightly drier and the flavor less sweet. Sweetened shredded coconut gives these homemade coconut caramels the best chewy texture and balanced flavor.
Can I make coconut caramels without a candy thermometer?
A candy thermometer is strongly recommended for this recipe. Caramel texture depends on exact temperature, so using a thermometer is the best way to make sure the caramels turn out soft, chewy, and sliceable.
How long do homemade coconut caramels last?
Homemade coconut caramels can be stored in an airtight container at cool room temperature for up to 2 weeks. For longer storage, refrigerate them for up to 1 month or freeze them for up to 3 months.
Can I freeze coconut caramels?
Yes, coconut caramels freeze well. Wrap each caramel individually in wax paper, place them in a freezer-safe container, and freeze for up to 3 months. Thaw before serving for the best chewy texture.
Why did my caramel separate or look greasy?
Caramel can separate if it is cooked over heat that is too high or in a thin saucepan with hot spots. Use a heavy-bottom saucepan, cook over medium-low to medium heat, and stir constantly for a smooth caramel texture.
Can I dip coconut caramels in chocolate?
Yes, cooled coconut caramels can be dipped in melted dark chocolate, milk chocolate, or white chocolate. Dark chocolate is especially delicious because it balances the sweetness of the caramel and toasted coconut.
Are coconut caramels good for gifting?
Yes, these coconut caramels are perfect for holiday gifts, homemade candy boxes, party favors, and dessert trays. Wrap each caramel individually in wax paper for a polished candy-shop style presentation.

Coconut Caramels
Equipment
- Heavy-bottom saucepan
- Candy thermometer
- Silicone spatula
- 8×8-inch metal baking pan
- Parchment paper
- Sharp knife
- Cutting board
- Small skillet (for toasting coconut)
- Measuring cups and spoons
Ingredients
- 3/4 cup unsalted butter
- 3/4 cup packed light brown sugar
- 1/3 cup granulated sugar
- 1 cup light corn syrup
- 1 can 14 ounces sweetened condensed milk
- 1/2 cup heavy cream room temperature
- 3/4 teaspoon fine sea salt
- 2 teaspoons vanilla extract
- 1/2 teaspoon coconut extract
- 1 cup sweetened shredded coconut toasted and finely chopped
- Flaky sea salt for topping optional
Instructions
- Line an 8×8-inch metal baking pan with parchment paper and lightly grease the parchment and sides.
- Toast the shredded coconut in a dry skillet over medium-low heat for 5-7 minutes, stirring constantly, until golden brown and fragrant. Let cool completely, then finely chop.
- In a heavy-bottom saucepan, combine the butter, brown sugar, granulated sugar, corn syrup, sweetened condensed milk, heavy cream, and salt.
- Cook over medium-low to medium heat while stirring constantly with a silicone spatula until the mixture is smooth and fully combined.
- Continue cooking and stirring until the caramel reaches exactly 245°F on a candy thermometer. The caramel should be thick, glossy, and medium caramel brown.
- Immediately remove from heat and stir in the vanilla extract, coconut extract, and toasted coconut until evenly combined.
- Pour the caramel into the prepared pan and smooth the top.
- If desired, sprinkle lightly with flaky sea salt.
- Let the caramel cool completely at room temperature for 4-6 hours or overnight.
- Lift the caramel from the pan using the parchment paper and cut into squares with a lightly greased sharp knife.
- Wrap individual caramels in wax paper if desired.
Notes
🥥 More Coconut and Caramel Recipes You’ll Love
If you love these rich and chewy Coconut Caramels, be sure to try some of my other homemade caramel and coconut-inspired recipes. From fruity caramel candies to tropical coconut treats, these recipes are perfect for satisfying your sweet tooth and discovering new flavor combinations.
For another delicious homemade candy recipe, try my Raspberry Caramels. They feature the same soft and chewy caramel texture with a bright raspberry flavor that makes them perfect for gifting, holidays, and special occasions.
If you enjoy citrus desserts, my Orange Caramels are packed with sweet orange flavor and buttery caramel goodness. They are a wonderful twist on traditional homemade caramel candies.
Coconut lovers should also check out my Ube Coconut Thumbprint Cookies. These colorful cookies combine nutty coconut flavor with sweet ube for a unique and eye-catching dessert.
Another tropical favorite is my Guava Coconut Thumbprint Cookies. The fruity guava filling pairs beautifully with the coconut cookie base for a bright and flavorful treat.
If you’re looking for something completely different, try my Gulkand Coconut Dosa. This unique recipe combines floral rose preserve and coconut in a delicious fusion dish that’s full of flavor and creativity.
Leave a Reply